How to point a Ku-band dish to get
Satellite Galaxy 25 signal with
Sonic View SV-4000 (last
updated on Jan 16, 2008 by an Oregon Center Quanyin Practitioner )
For do it by yourself the whole Very good
price Basic Complete system from
http://www.wsidigital.com/smtvsat/products.htm , 76 cm dish + Traxis DBS3500
Receiver costs about 170 dollars, or a high end system 100 cm dish + Sonic View
SV-4000 Receiver (programmable via USB and Sat & Chanel Meter function included) costs about
350 dollars, that is, no monthly, no yearly whatever fee, it is 100% legal in
United State. For more information in detail or where to buy please read
FindGalaxy25FAQ.htm pages.
The purpose of this guide is to show you how to
get SMTV from Satellite Galaxy 25 (old IntelStar5) in USA
with particular Sonic View receiver model SV-4000 ONLY, simply because
the writer never had experience with receiver model Traxis DBS3500, if
someone has experience with receiver Traxis DBS3500 and want to share
then I will be happy to prepare a "how to" guide for receiver Traxis DBS3500
upload it on internet, if your area is clear for 76 cm size dish and
you already have some experience with FTA system them the 76 cm dish +
Traxis DBS3500 Receiver system will save you some money.
Again this guide is for particular receiver
SV-4000 only, the guide relies mainly in Signal (Sat&Chanel) Meter function of
SV-4000 to locate the SMTV signal so it is non sense to use this guide with
other receiver model. Comparison of two basic and high end systems can be found
on Q1& Q2 of the
FindGalaxy25FAQ.htm pages
If you still have no clue "how to do" after read
through this guide or you are so new to satellite stuff then it is advised that
you skim through the applicable sections of "SV-4000 Manual" and "SelfInstallGuide.pdf" and then read this guide again.
These docs can be down loaded on Q9 of the
FindGalaxy25FAQ.htm pages.
https://g25smtvfinder.tripod.com/index.htm is the internet address (URL) of
this guide. If tripod site busy you can go to URL
http://www.geocities.com/g25smtvfinder ,
they are identical. The writer assume no responsibility for using
this guide, use it with your own risk.
Assume that you already have a Ku 39" dish and
Receiver SV-4000 + cable accessories ... here we go:
1.0 Finding a Clear Line of Sight to
install dish (picture below is just for Portland and Seattle
areas)
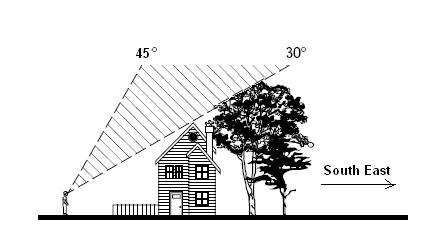
- Go outside and locate at least one site
on your property that has a clear view to the satellite. You should be
reasonably certain you are pointing toward South East for Portland and
Seattle area (others: check your direction (Azimuth) from
http://satcalculator.freehostia.com/ )
- Imagine an arc ranging from 30 to 45
degree above the horizon (as figure above)
- Do you have at least one clear view to
the satellite? Remember, no trees, leaves, buildings, or windows can be
between the dish and the satellite. If the answer is YES, your site
should be suitable for installing the system. Go ahead to the next
section in this guide.
2.0 Install dish
Follow instruction goes with your dish, if you
use a
pole for your dish then hammer the bottom the pole to "un-round" it before you
pour concrete on it so it
can not rotate around easily after concrete settled, of course the pole should be a good
quality one, otherwise the dish will be vibrated by wind and system will
have poor signal, tight the nut just enough so the dish can be adjustable, the
dish should point to (Azimuth) about 150 degrees (where magnetic North = 0 deg) and the elevation
about 30 degrees (with horizon). The actual Azimuth and Elevation of some USA Centers are
Portland Oregon Center,
Magnetic Azimuth: 129 degrees , elevation: 32
degrees
Seattle, WA Center,
Magnetic Azimuth: 130 degrees ,
elevation: 30 degrees
Hamilton, Ohio Center,
Magnetic Azimuth: 204 degrees ,
elevation: 42 degrees
Dallas, Texas Center,
Magnetic Azimuth: 175 degrees ,
elevation: 52 degrees
Glendale Arizona,
Magnetic Azimuth: 142 degrees ,
elevation: 48 degrees
New Jersey Center,
Magnetic Azimuth: 226 degrees ,
elevation: 37 degrees
San Jose Center,
Magnetic Azimuth: 128 degrees ,
elevation: 39 degrees
LA Center,
Magnetic Azimuth: 133 degrees ,
elevation: 45 degrees
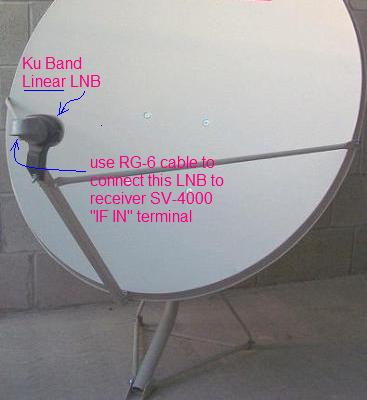
3.0 Set up Dish - Receiver - TV station
Set up a station near the dish so you can see the
signal change when rotating the disk . Follow the receiver SV-4000 manual,
connect a LINEAR LNB of dish to (IF-in) input of receiver, connect TV to "TV
OUT" of receiver, TV should be set at channel 3 . In test phase all connection
will go thru straight cables WITHOUT any SWITCHES
3.1 Verify TV connected to Receiver
properly
Assume that you've done all above steps, start
from all units in OFF condition:
- Make sure your Receiver RCU (Remote Control
Unit) battery install, press STB (Set Top Box = Receiver SV-4000) button,
you should see the STB button short flash ON, at this step you are sure that
your RCU is set up to function with the STB (Receiver) unit. BTW (By The
Way) take a moment to look on the RCU for where is the Power On (Top Red
Button), MENU, EXIT, OK, Left/Right, Up/Down buttons. BTW look on the top of
the RCU key pad you will see 4 round 1/4 inch buttons RED, GREEN, YELLOW and
BLUE these 4 buttons are not named, their functions change with the incoming
setup screen. Please press STB on the RCU and verify that a brief flash on
the STB button before continue
- Turn TV ON, set TV for Channel 3, you should
NOT see any thing good at this time
- Turn Power ON (I) button from the back of
the STB (receiver SV4000) then press the RCU red Power Button to turn on the
STB unit if every thing done correctly you should see the "BOOT" letter on
panel of the STB and a language screen as Fig 3.1a appears on TV. Use
up/down and OK of RCU to select you favor (English) language. Up to this
step the Receiver and TV connected properly - Congratulation!
- note1: after hit OK you might see TV
screen completely black, it is OK since your STB is brand new.
- note 2: if your STB is not new you might
not see the language screen, in this case you test system by press MENU then
you should see screen likes Figure 3.2.a, press EXIT to go back to normal
screen
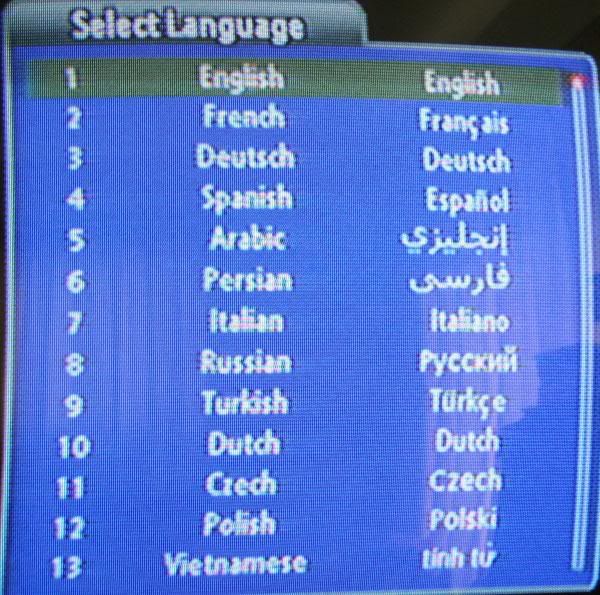
Fig 3.1a Language Screen
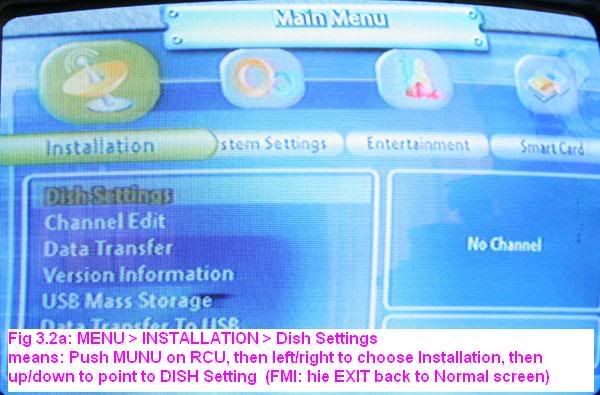
3.2 Some thing about installation screen
For practical purpose you do not need to connect
receiver to the LNB (dish) to perform this section 3.2, the section 3.2 shows you
how to use RCU to get around the INSTALLATION screens, Please take 15 minutes to
practice this section 3.2 before perform FIELD work of section 3.3, this 15
minutes studying will save you a lot of sweats in the future:
- First, do NOT use RCU yet, scroll through the
Fig 3.2A to 3.2E below to make a quick view of them in order to have a general idea how the
installation screens look like.
- Assume you are in normal screen, press
MENU
on RCU, press left/right to select INSTALLATION, press up/down to select
DISH SETTINGS, now your TV screen should look like Fig 3.2A
- Press EXIT on RCU unit to get back to normal
screen, from now on if you messed up with MENU you just press EXIT on RCU
unit to escape back to normal screen
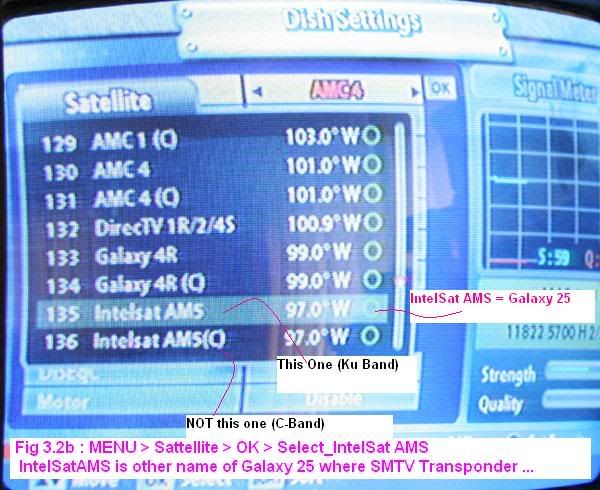
- MENU > (Left/right)INSTALLATION
> (up/down)DISH SETTING > OK
>OK (again) > (up/down)Select_IntelSatAMS
will lead you to Fig 3.2B screen, on the top of this screen you
might see the
receiver is configured for Sat AMC4 (for brand new receiver), The SMTV is in Sat IntelSatAMS (Galaxy
25) so using up/dowm to navigate to Sat IntelSatAMS (Galaxy 25) as Fig
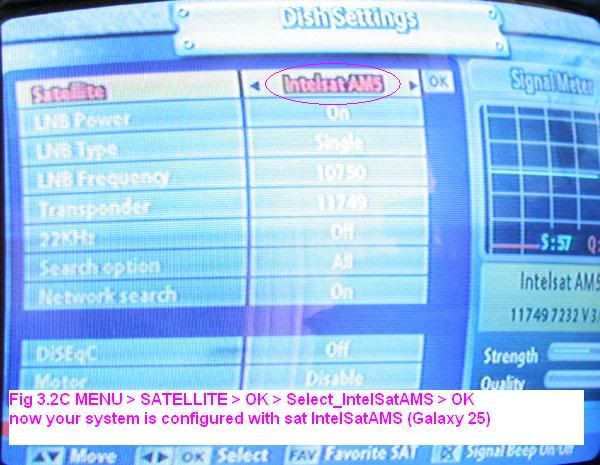
3.2B screen. Next you do OK [ or full sequence
MENU > (Left/right)INSTALLATION
> (up/down)DISH SETTING > OK
>OK (again) > (up/down)Select_IntelSatAMS
> OK ] the screen as Fig 3.2C should
appear now you should see the Sat IntelSatAMS (Galaxy 25) appear
on the top of screen, congratulation, you are lined up your Receiver with
Galaxy 25 electrically but physically you are not (because look at Signal
Meter of figure 3.2C you would see your signal quality Q = 0). Section 3.3
will show you how to physically line up with Galaxy 25 by proper
rotating the dish
-
http://www.lyngsat.com/galaxy25.html shows Sat Galaxy 25 broadcasts more
than 50 Transponders, each transponder carries a particular frequency that
contains about 10 channels, for example, SMTV and other 9 channels belong to
Transponder of frequency 11716 Mega Hertz ( Transponder11716), since
Transponder11716 is new so it is NOT in the internal data bank of SV-4000 or
any other manufacture machines at this time. Next will show you how to
inspect if the Transponder11716 is in your receiver, if TP11716 does not not
exist then it will show you
how to add Transponder11716 to receiver "electronically" .
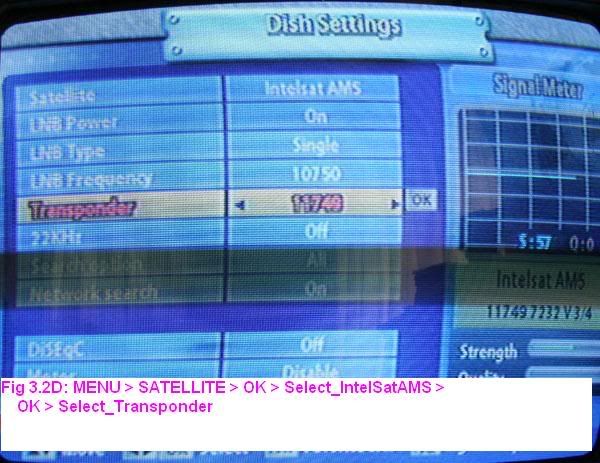
- MENU > (Left/right)INSTALLATION
> (up/down)DISH SETTING > OK >OK (again) > (up/down)Select_IntelSatAMS >
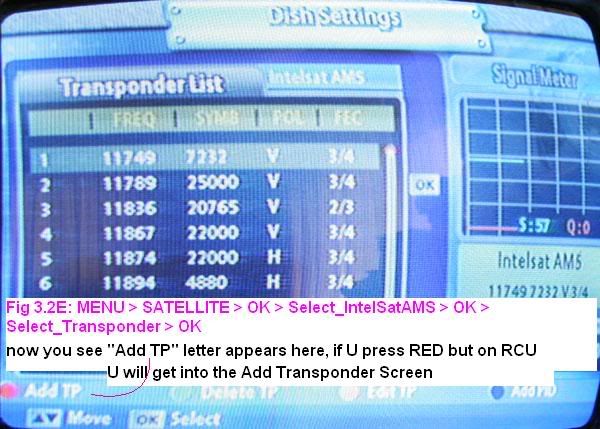
OK > (up/down)Select_Transponder > OK>
then you should go thru screen Fig 3.2D and and up at screen Fig 3.2E, if
you do correctly you should see "Add TP" term near the bottom small RED
circle (button) of Fig 3.2E, Do NOT use RCU on RED button yet, but if press
the RED button on RCU it will allow you to add a new transponder, again Do
NOT use RCU yet, take a pen and note the parameters of SMTV channel
Frequency: 11716, Sample rate: 22000, Polarization: Vertical, FEC: 1/2 .
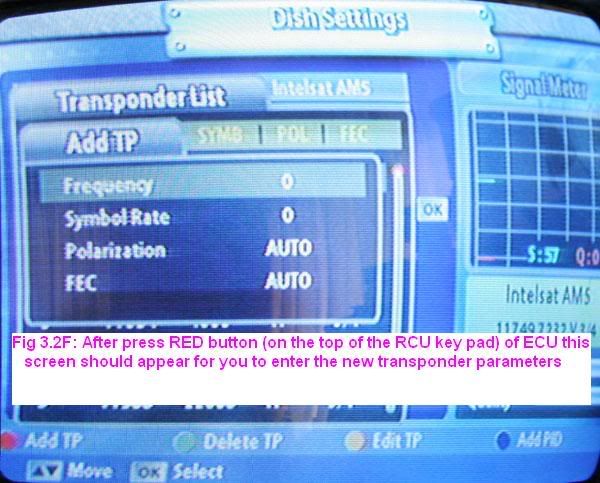
- Make sure you are on screen as fig 3.2E, use
RCU to press on the RED button "Add TP", if you do everything correctly then
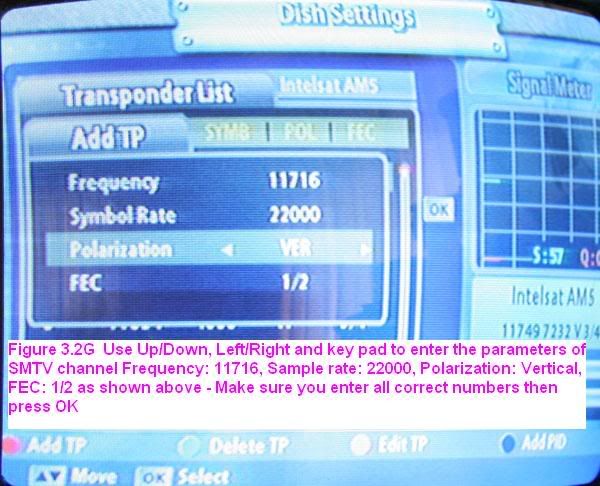
you should see screen as fig 3.2F, use left/right - up/down and key pad to
enter the value Frequency: 11716, Sample rate: 22000, Polarization:
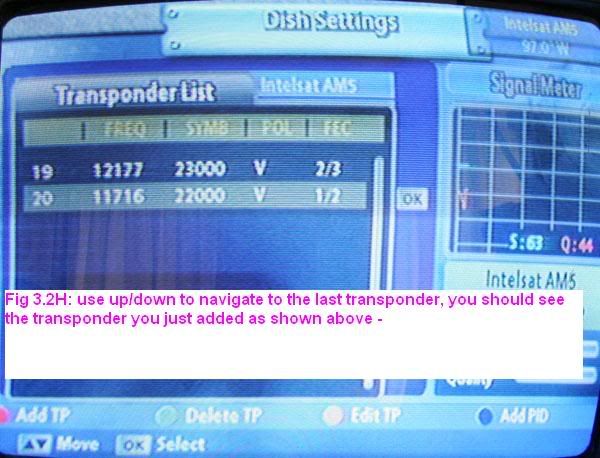
Vertical, FEC: 1/2 as shown on figure 3.2G, now press OK you will return
back to TP screen, use up/down to navigate to the transponder you just added
in as shown on fig 3.2H, then press OK again you should get to "Signal
Finder" screen as shown on Fig 3.2K. Congratulation! You did a good job, you
just line up your receiver to SMTV sat "electronically", most of people
failed to setup because they missed this electronically line up
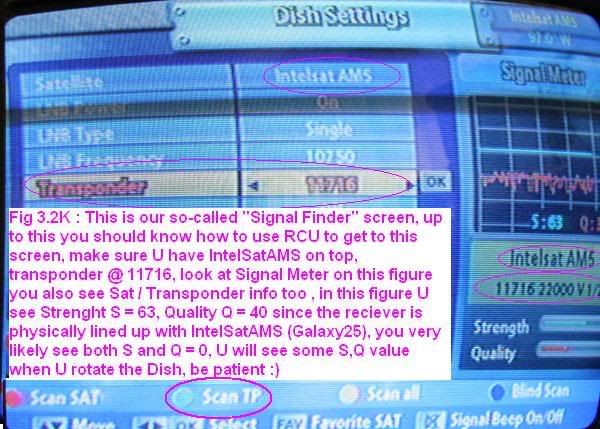
- Some notes about Fig 3.2K : This is our
so-called "Signal Finder" screen, up to this point you should know how to
use RCU to get to this screen, make sure U have IntelSatAMS on top,
transponder @ 11716 MHz, look at Signal Meter
on this Fig 3.2K you also see Sat / Transponder info too , in this Fig 3.2K
you see Strength S = 63%, Quality Q = 40% since the writer receiver is
physically lined up with IntelSatAMS (Galaxy25) AND
transponder11716 , you very likely see both S and Q = 0, U will see some S,Q
value when U rotate the Dish, be patient, you will do it shortly
- Before you perform field work it is advised
that you know how to get in and out "Signal Finder" screen at will, imagine
your dish on a top of building and your partner has trouble to get to
"Signal Finder" screen, it will not be fun at all, so now press EXIT on RCU
and please use RCU to go back to the "Signal Finder" screen, if you
can not do it right then here is a hint: MENU >
(Left/right)INSTALLATION > (up/down)DISH SETTING > OK >OK (again) > (up/down)Select_IntelSatAMS
> OK > (up/down)Select_Transponder > OK> (up/down)Select_11716 > OK
then you should see our so-called "Signal Finder" screen as shown on figure
3.2K
- Now scroll down this document to section 3.3
for field work
3.3 Pointing Dish to Galaxy 25
In this section you DO need to connect
receiver to the LNB (dish) and receiver must be in "Signal Finder" screen mode
to do the pointing process, since this is kind of a tedious
process, please prepare all necessary tools and equipments must be set up
correctly to have a good result
- Use Sections 1.0, 2.0, and 3.0 as a guide to set
up test station near the dish so when you rotate the dish you can see the
signal Strength S and Quality Q changed on "Signal Meter" panel as shown on
fig 3.2K "Signal Finder" screen.
- Assume that you are at Fig 3.2K "Signal
Finder" screen during all pointing process.
- If your neighbors have Dish NetWork or
DirectTV system, you can use their dish as reference for direction (Galaxy
25 orbits at 97 deg, DirectTV orbits at 101 deg)
- Do NOT press RCU scan buttons until procedure
tell you to do so, please DON'T
- For Seattle or Oregon center you try to
rotate left/right VERY slowly azimuth around 130 degrees, rotate up/down
VERY slowly elevation around 30 degrees such that strength S > 55%, Quality
Q => 35% , be patient! all rice and tofu are here ! That all you have to to
do, if you got it - you're completed 99% of the job
- You should see S before you see Q value, if
you see S > 50 but Q = 0 then ... it is normal, even you line up to a wrong
satellite you still have a good S value (but NOT Q value), our Galaxy 25
orbit at 97 degree but believe it or not there are 2 satellites nearby at 95
degree, another 2 satellites nearby at 99 degree, thus within +/- 2 degree
we have 4 unwanted satellites nearby, keep in mind +/- 2 degree is about big
as few hairs! if you have error +/- 10 degree you might line up with another
30 unwanted satellites. So the question "In 30 unwanted satellites, how does
I can identify which one is the correct Galaxy 25 one ?" the answer is
"That's why you need the Q value for, that why you have to be configured as
Fig 3.2K "Signal Finder" during pointing process.
- As discuss on step 3.3.6 above, if we do
step 3.3.5 slowly and carefully you should get S value easily, if you try
very hard but you still get nothing then please check cable line from LNB to
receiver, is your LNB is a LINEAR type ? (for Linear LNB you should see its
frequency label at 10750 MHz), is your receiver configured as shown on Fig
3.2K "Signal Finder" screen ?
- If you start to get S signal that means at
least your connections are good, do not worry about Q value for now, try to
up/down fine tune to maximize the S signal then lock the ELEVATION nut,
since all satellites fly at same altitude so the elevation control make not
much difference between them, for 39" dish you can get S value at 100%
easily in a clear day.
- After having a good S value (say > 60%) now
you go to search for Q value by rotating slowly (for machine responds to
signal) left/right about 30 degrees, observe the Q value on SignalMeter
panel for any spike on Q value, if you get any spike of Q value then stop
there and mark on the azimuth and elevation nuts, now you turn left/right
VERY slowly to maximize the Q value, you can release the elevation nut and
combine left/right and up/down to fine tune Q value again, in good weather
you can get Q at about 60% easy, Q value should be greater than 40% for
so-called good signal, at Q = 30% system barely works. Conclusion: If you
get Q value greater than 40% you've done 99% of this job!
- If you get a workable optimum Quality Q
value then LOCK and mark the azimuth and elevation nuts, if you can not get
a reasonable Q value then please repeat steps 3.3.1 to 3.3.9 of this guide.
For very fine tune on the LNB can be found from Q13 of the
FindGalaxy25FAQ.htm pages.
Still have trouble? goto WhyItDoesnotWork.htm
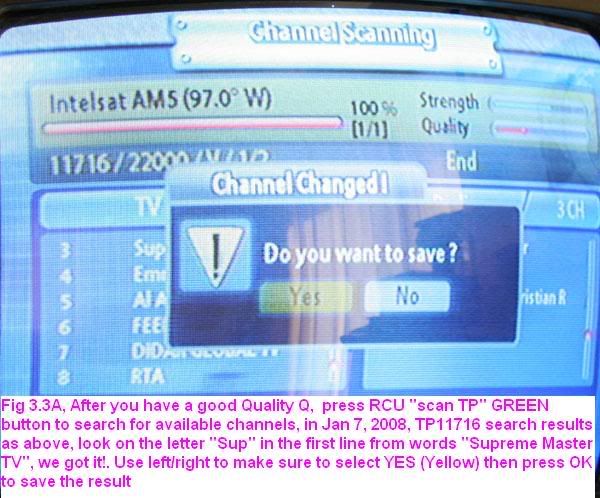
- At this step we assume that you already have
a good Quality Q, press RCU "scan TP" GREEN
button to search for available channels, the search result should look like
as shown on Fig 3.3A that scanned TP11716 on Jan 7, 2008. Take a look
on the letter "Sup" in the first line of
channel 003 on Fig 3.3A, it is a part of the
words "Supreme Master TV",
we got it!. Use left/right to make sure to select YES (Yellow) then press OK
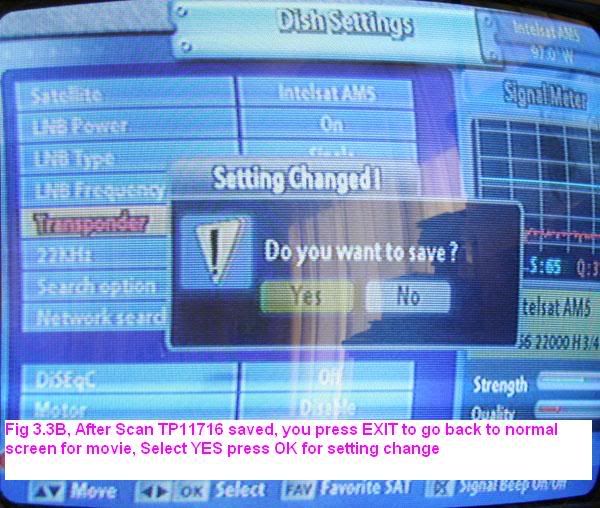
to save the result. After Scan results of TP11716 was saved as Fig
3.3A, you press EXIT to go back to normal screen for movie, Select YES
(Yellow) press OK for setting change as shown on Fig 3.3B. After this you
should be in the normal screen
- At this step you should be in the normal
screen, use RCU channel up down to find the SMTV channel, in my particular
case figure 3.3A tell SMTV is channel 003,
however, your case the SMTV channel number might be different, (if by
mistake you scanned Satellite instead of scanned TP11716 you might end up
with hundreds of channels that take you a long time to locate the SMTV).
To this point you are successfully completed the job.
3.4 Few extra thing you might want to know
This section suggests few thing to verify that
your work done correctly:
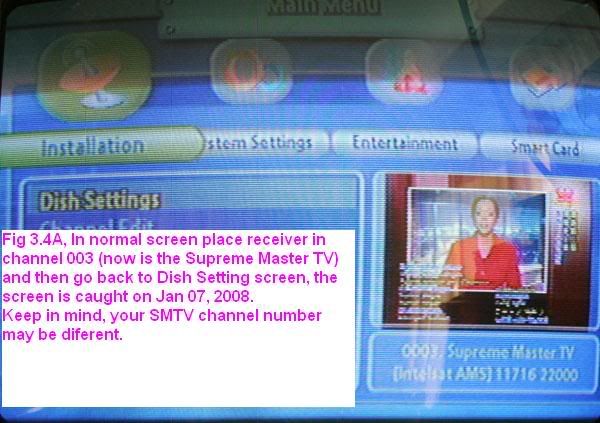
- MENU > INSTALLATION,
you should see now SMTV is a main player in installation screen as shown in
figure 3.4A
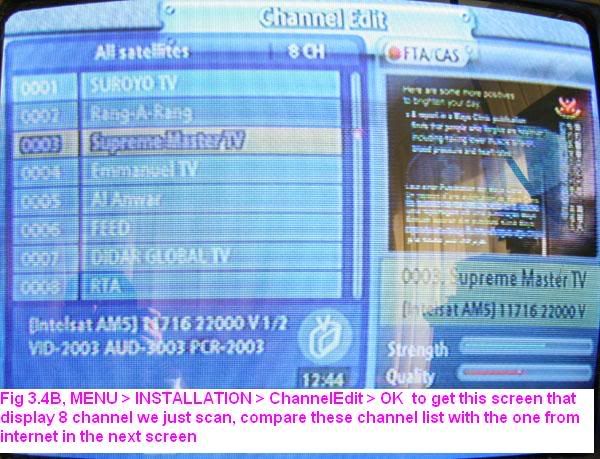
- MENU > INSTALLATION >
ChannelEdit > OK, you should see all
channels you just scanned TP11716 display as shown in figure 3.4B
- go to
http://www.lyngsat.com/galaxy25.html you should see all channels
listed for TP 11716 as shown in figure 3.4C, compare fig 3.4B and fig 3.4C
to have a rough idea about "our" transponder. In the future if you have a
trouble about transponder information then the
http://www.lyngsat.com/galaxy25.html site is the site you should look at
first.
- You can get few more percents on Q value by
doing a very fine tune on the LNB, this procedure can be found from Q13 of
the FindGalaxy25FAQ.htm pages.
- I will leave misc issues as running cable
thru the wall of your house, thru the switches etc for yourself.
- If you try to run signal thru switches then
please read Q17 of the FindGalaxy25FAQ.htm pages
first.

3.5 What if I tried hard but it simply does
not work ?
You see this guide give you many real screen
copies from real work, if you do it correctly it should work, however, if
it does not work you should write down what step # you are, what screen you see
so we can help you by phone. If you are in Seattle or Portland areas the writer
might come to help you. The writer is about 60 years old, he can help you
technically how to point the dish to the right direction, but will not
help you physically to set up the system.
Before call for help please read this document
and FindGalaxy25FAQ.htm carefully
first.
Currently writer is happy to train any young
brothers/sisters who really want to learn and help, hopefully these young
brothers/sisters will help you to set up the system both electronically and
physically
Thanks
WML, NamMo THVTS
by a practitioner of Oregon
Center Jan 16, 2008